|
|
|
There are several offensive schemes that teams could use. Most teams, however, use the Stack Offense. New teams or pick-up teams find this scheme useful since all players know it. There has been a growth of new schemes over the past few years. A partial list of these includes: a) German Offense, b) Swedish Offense, c) 3-4 (or Handler Iso) Offense, d) Victoria Offense, e) Spread Offense and f) Finnish Offense.
Usage of the German Offense, in particular, has seen notable growth (especially in Germany, oddly). In 1999 at the Rimini, Italy beach tournament, the two finalist teams were German teams.
We will discuss the Stack Offense, the 3-4 Offense, and the Spread Offense in some detail. Hopefully, you will decide that offensive schemes other than the Stack Offense have great potential, and deserve a key role in any team's offensive package (i.e., several schemes could be used during a game).
This basic, default offense has its merits but it also has many drawbacks. Among them are:
We will provide suggestions to improve the Stack Offense, plus describe alternative schemes which include:
This very simple scheme uses a lateral stack rather than a vertical stack. It is designed to open up the playing area by moving 4 of the players (and their defenders) at least 20-25 yards from the Handlers, and to let the Handlers do Give & Goes most of the way up the field.
This offense offers a much greater set of strategies than the 3-4 Offense, while possessing the same intent: open up the field, reduce poachability, give the receivers more room to cut, and set up subsequent throws from an endzone-facing position.
We also discuss different techniques and plays
which may be used by any offensive scheme. These include
the Dump/Iso technique, the
Break Trap Play, the
Endzone Play, and the
Fly Play.
The use of a Dump is highly recommended in any type of offense. It removes one offense-defense pair from in front of the disc, and opens up the field somewhat. It's mainly used as a safety valve if things bog down (which happens all too often). A side benefit is that it can often be a good tactic to gain an open throw.
The success of the dump (or Iso, which is a forward dump) play depends on the Handler and the Dump knowing what options are available and who will initiate the action (cut versus throw). The general rule is: 1) if the Dump's marker is looking at the Dump, the Handler will initiate action with a throw; or 2) if the Dump's marker is looking at the Handler, the Dump will initiate action with a cut.
The key to setting up a successful dump pass is for the Dump
to stand still behind the Handler (see figure).
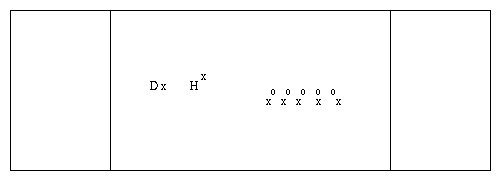
Once the Dump is stationary, two things happen: 1) the marker is forced to make a choice of looking at the Handler or the Dump (unless the marker is behind the Dump, of course), and 2) the Handler, as is typically the case, does not have to guess when the Dump has made her/his last fake and is making a real cut.
The Dump's marker may front the Dump or set up slightly behind the Dump at an angle so the Handler and the Dump are both visible. In the case of fronting, the Handler should be a happy camper, as the disc may be thrown to either side of the Dump. In the angle-defense situation, the Dump should casually move back to stand directly behind the marker (then come to a standstill). This will open up the throwing space between the Handler and the Dump, and/or cause the marker to be forced to look at only one of the two offensive players.
If at all possible, the dump pass is to be thrown into the
open space (away from the Handler's marker) lateral to the Handler
(see figure)
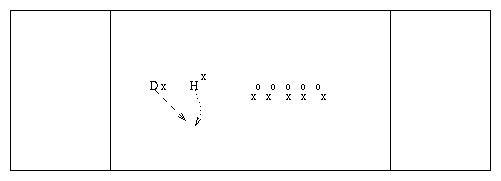
This will give the Dump the position for an upfield throw, and the throw won't be impeded by the Handler's position. After making the pass, the Handler then either becomes the new Dump (preferable), or takes a give-and-go pass in return.
One technique that works very well is for the Handler to fake a dump pass to the spot where the Dump is standing (and for the Dump to fake a cut or catch), then make the pass into the flat. At such close range, the Dump's marker almost always falls for the fake.
The type of pass that the Handler makes is that of a flat, short, floating pass which will either be thrown to a spot where the Dump is cutting (when the Dump initiates action), or to a spot where the Handler wants the Dump to cut (when the Handler initiates action). The ability to throw a nice, floating pass is necessary (if this throw is not in your arsenal, please work on it so that you have it).
The dump pass should be made whenever the stall count reaches 7. Also, when in doubt regarding the success of a potential dump, one can do two things: 1) call time out, or 2) huck the disc long (obviously, not the preferred option).
The concept of standing still is fundamental to the success of the dump (and Iso), the Endzone play, and the Break Trap play. The use of this concept will significantly increase the chances of a completed pass anywhere on the field. Remember, turnovers are terminal.
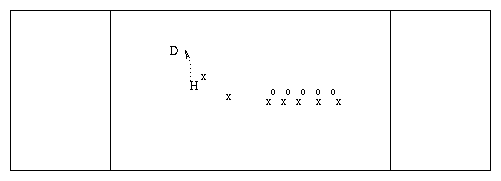
One last point. The Dump's marker will on occasion leave
the Dump and attempt to poach the Handler's throw; sort of a
close-in poach. When this happens, the Dump should move to set up on
the side of the field opposite of the poach (usually the break-force
side of the field) and call for a pass (not waiting for a
high count) (see figure).
In addition to the benefits of incorporating the Dump, the Break Trap play, the Fly play, and the Endzone play into the Stack Offense's basic strategies, there is a fundamental concept which could well make the Stack Offense much more effective. This will be discussed in general and in transition near the endzone.
The fundamental concept (which admittedly is counter intuitive) is: as the disc progresses up the field, each player who finds himself or herself behind the disc is now out of the remainder of the play. Other than filling the very important role of lining up behind the offensive player with the disc as a Dump, the players who have passed the disc forward do not move to return to the stack.
The impacts of this are:
Assume your team is on defense, and that a turnover occurs shortly after the pull is received (say, within 20-25 yards of the endzone). The typical reaction is: a) someone rushes to pick up the disc for a break-away opportunity while the rest of the 13 other players are streaming past, heading for the endzone; or b) everyone moves to stack up in the endzone, leaving the main Handler to walk up to the disc and initiate a stack-based play.
These scenarios often result in turnovers because of rushed throws, poor throwing angles, poaching, and/or too many people in a small space which leaves small places into which to cut. An alternative to these two scenarios is to have one receiver move to the endzone (or, at most, two receivers); this is the person usually furthest upfield. The next nearest player becomes the thrower, and the 3rd nearest player moves to become the Dump (see discussion of Dump techniques). All other players stand still, allowing the first two players to run the Endzone Play.
If this happens relatively quickly, the other players'
defenders typically remain near their marks. This leaves the passing
lanes open, and pits the lone receiver one-on-one versus his/her
defender. The effect of this strategy should be to increase the
chances of scoring.
The 3-4 offensive scheme is very simple. Other teams may use a version of this type of scheme, and call it an Iso or Handler Iso. Our scheme utilizes 3 Handlers and 4 Longs.
It is very important that the 4 Longs run downfield to set up
immediately upon the pull being thrown. This will help minimize the
possibility of poaching by the markers of the Longs. The 4 Longs are
to set up in a lateral stack about halfway down the field, on the left
side of the field (see figure).
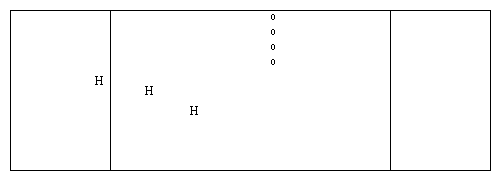
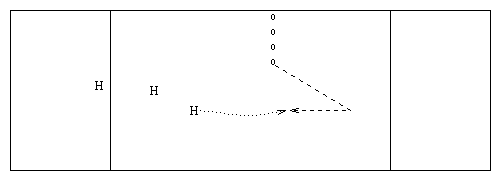
Spacing between Longs should be about 3 feet, so that the center-most Long (called the Target) is about 15 to 20 feet from the sideline. The 3 outside Longs are basically decoys, and their job is to be a receiving threat, holding their markers near them. However, any one of the 3 outside Longs can (and should periodically) break for a pass, being careful to avoid a pick. The choice of which Long takes the Target role is determined by best mismatch, best Long, or simple rotation.
The Target is the most likely recipient of a pass, and is the first
option for a cut. The Target may cut long, laterally across the
field, or back towards the disc. One distinct advantage of this
scheme is that there should be no markers upfield from the lateral
stack, thus allowing the Target to cut to an area of the field
without poachers. Typically after a few receptions by the Target in
the endzone (or any long throw upfield from the stack),
the Target's marker will overplay the
long cut; this opens up the bowling alley, or comeback, cut
(see figure).
The key to success by the Handlers is patience. Essentially, the Handlers are playing 3 on 3, and should be able to move the disc without forcing it. One of the Handlers operates as a Dump (see the separate discussion of dump techniques); the Handler who takes the pull usually starts out as the Dump. That leaves the other 2 Handlers to work give-and-go passing down the field.
Each time a pass is caught by a Handler, a look should be made downfield to see what the Target is doing; if a pass is there, take it. If the disc stalls whilst in the process of being worked downfield by the Handlers, the Handler with the disc essentially has 2 options. First, a dump pass may be taken. Second, the pass to the upfield Handler is really a dump in reverse, and should not be difficult to initiate. Again, see the separate discussion of dump techniques.
If a non-scoring pass is made to a Target, there are two options.
First, if the reception is made over 20 yards from the endzone, one of
the Handlers takes a dump from the Target, and the lateral stack
resets (the distance of the stack from the stationary disc is at
least 25 yards).
The Handlers, then, resume their give-and-go passing. Second, if the
Target receives a non-scoring pass within 15 to 20 yards of the
endzone, then the Target should call for the Endzone Play (see the
separate discussion of the Endzone Play).
The Spread Offense is a conundrum: it is the simplest of schemes, and
yet is the most counter intuitive. Veteran players have the most
difficulty learning it because they essentially are genetically
programmed to stack. The Spread does not use a stack at all. The
middle of the field is left open to be used by the Handlers (H), or one
of the Middles (M) or Longs (L) at a time (see figure).
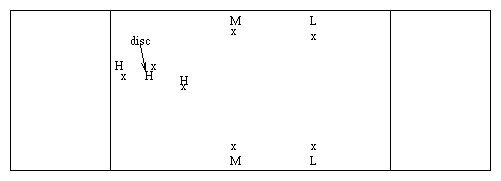
Two or 3 Handlers may be used (3 are shown in the diagram
above). Using 2 Handlers allows a 3rd Handler to occupy a Middle
position, thus increasing the chances for completed passes as the play
progresses upfield. When 2 Handlers are used,
a 2nd Long sets up on the sideline further upfield (see figure below).
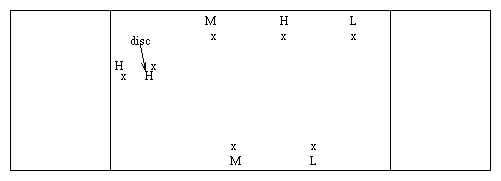
Using 3 Handlers often will allow the first pass to be longer should the Pull be one that quickly covers the length of the field; the remaining two Handlers can then set up a little further upfield in such a case. A strategy which would accomplish this while, at the same time, allow the 3rd Handler to occupy a Middle position is to have a weaker thrower take the Pull, and make the first pass. This strategy might backfire if the Pull goes out of bounds, or if it hangs in the air, and allows the defense to mark up (if that occurs, the weaker thrower can be sent upfield).
The Spread Offense has the following objectives:
The real benefit of the Spread lies in having the disc within
20-25 yards of the endzone. If a Long's defender looks for the
disc, the Long can head to the endzone. If a Long's defender looks
only at his/her mark, one fake should make for an easy pass to that
Long (see figure). Yep, it's the Endzone Play
being run at an angle.
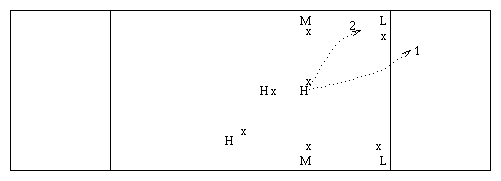
Keep in mind, there are no other defenders to help out against either the right Long or left Long in the endzone. It's basically 2 on 2 by the time it gets to that point, and the advantage is heavily in favor of the offense then. When in doubt, run the Endzone Play.
The simplest play that takes advantage of the open field is to have the Handlers Give & Go all the way to the endzone. This works especially well if there is a significant 2-person or 3-person mismatch. A fun example is for a team with strong women to Handle, and the men occupy the sidelines and stay out of the way. (In such a women-as-Handler situation, the typical pattern is that the Longs' defenders will want to poach to protect the endzone, leaving the Longs for open passes to either corner.)
The Gauntlet works because there is so much room for passes to be thrown and received. It's as if you were playing 2 on 2, or 3 on 3; there is nearly always a place into which to cut.
A Side Note on the Give & Go: if it breaks down, there are 3 ways to recover:
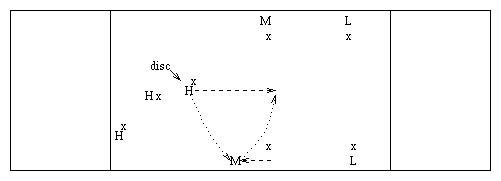
Following a pass to a Middle or Long, there are 2 options. If the
pass goes to a Middle on the sideline, the Handler can cut further
upfield for a return throw right back, thus continuing the Gauntlet
(see figure).
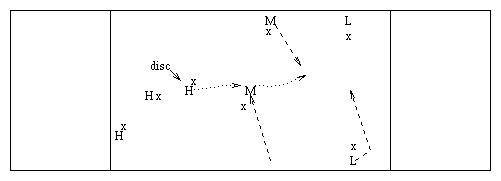
Or, if the Middle (or Long) received the pass in the middle of the
field, s/he may then look to throw to the other Middle or Long
(see figure).
A key point to remember is that the person with the disc (whether a Handler, Middle or Long) is responsible for determining who gets the disc next. If need be, the thrower should call out the next receiver, or call for the Iso ( Endzone) Play.
You will notice that as the disc progresses
upfield, the Middles and Longs will maintain their relative position
to the disc by sliding up the field toward the endzone. Only one of
them, however, will actually enter the endzone (the other players
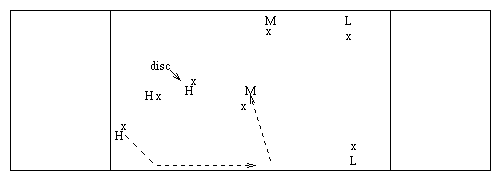
position themselves on the goal line, on the sideline). If a Middle
takes a pass from a Handler (or the other Middle), a Handler will take
that Middle's vacated place on the sideline (see figure).
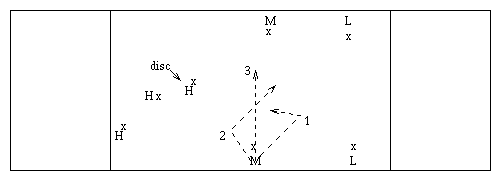
One of the main benefits of the Spread is to have a featured player who is a Middle or Long. Usually, this person is someone who has a mismatch, whether it be speed, height or savvy. Or, the Featured Player may simply be someone who hasn't touched the disc in a while.
Once the Handlers move the disc upfield a ways, a Handler can then look for the Featured Player to cut; the other Middles and Longs stay on the sideline. The Featured Player can:
After the Featured Player receives the pass, s/he simply turns and looks for a Middle or Long for the next cut (keep in mind that the thrower of the pass hangs back, probably to become the Dump). There is no hurry; none. The isolated defenders are in trouble. Only a bad throw (e.g., hanging the disc up) or a cut that is broken off will cause a problem.
Voila! You have just taken the Spread Offense course 101.
It's up to you now to make it work, and to create your own plays
and variations on this theme.
This play is very similar to a dump
play, and is basically a
specific instance of the Iso play. The set up of this play is as
follows: the Handler has the disc and is trapped on a sideline. A
receiver is in an Iso position about 10 yards in front of the Handler,
also on the sideline (or just a few feet inside the line), and is
standing still. A Square is even with the Handler for a bail out
pass, if needed. The other 4 players are across the field, away from
the play (see figure).
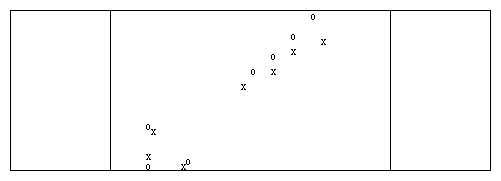
Note: the Iso does not cut to the sideline position. S/he starts there, and stands still. As with how a Dump works, the general rule is: a) if the Iso's marker is looking at the Iso, the Handler will initiate action with a throw; or b) if the Iso's marker is looking at the Handler, the Iso will initiate action with a cut.
The typical defense played against the Iso is for the defender to front the
Iso, standing between the Iso and the sideline.
The most common and easiest play to make is for the Handler to (1)
pass to the Iso as s/he cuts toward the center of the field. The Handler
needs an inside out throw for this, but it is one that is fairly easy
to make. The other good option is for the Handler to (2) throw a short
curve pass around the Iso and Marker, leading the Iso just a little
down the sideline (see figure).
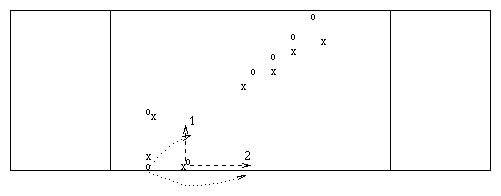
Both of the throwing options work surprisingly well, and result in an unimpeded throwing opportunity for the Iso who is then facing upfield. If both of these passes are unavailable, the Handler turns to face the Square, and typically will break the mark with a throw away from the offensive endzone. Please also note that besides being a bail out, the Square's secondary function is to keep the Handler's marker honest; the Handler may need to momentarily face the Square to effect a re-positioning of the Handler's marker.
It's uncanny, really, just how easy this play is to run once the 3 offensive players are in position. It is very hard to defend, and only fails if a poor throw is made.
Two other defenses may be played against the Iso, requiring the Iso to set
up a little differently. In both cases, the idea is to create enough space
so that the mid-range throw down the sideline is a threat.
The first alternative defense is when the defender sets up on the
inside of the Iso, thus making the cut to the center of the field more
difficult. To combat this defense, the Iso would gradually move
a few steps towards the
center of the field, then stop. This will open up the throwing lane down the
sideline. Again, the key to making this work is to position him/herself to
force the defender to choose between looking at the Handler or the Iso.
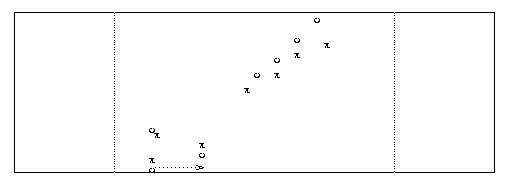
The second alternative defense is when the defender sets behind the Iso, so s/he can see both the Handler and the Iso. This position would make the pass down the sideline more difficult, but leaves the cut to the middle open, as well as a cut back to the Handler. To take advantage of this positioning by the defender, the Iso should gradually move a couple steps away from the Handler to open up the cut back space. An obvious next pass the Iso would then make would be a lead pass to the Square.
If a team is running the Spread Offense,
the positioning of the other 4 players will be as follows (see figure).
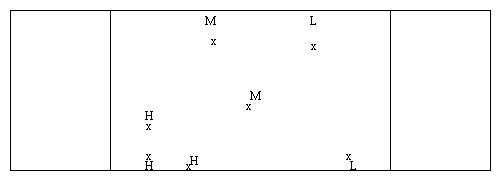
Note that the Long on the same side as the Iso is about 20-25 yards further upfield. This gives the Iso a Long as a target. The Middle who is about 20 yards upfield and in the middle of the field gives the Iso a solo target for the next pass.
The Middle and Long on the opposing sideline are positioned to open up
the field, allow the Middle in the middle of the field to have room to
maneuver, and to be targets for the next pass in sequence.
This play is another specific instance of the Iso play. The set up of this play is as follows: the Handler has the disc in the middle third of the field, within 15 yards of the endzone. A receiver is in an Iso position about 5 yards inside the endzone in front of the Handler. A Dump is positioned directly behind even with the Handler for a bail out pass, if needed.
The other 4 players are positioned on either side of the Handler (all
on one side, or split). If split, two of these players stand just
inside the goal line, on the side line; the other players are just
outside the endzone a yard or two in from the sideline (see figure).
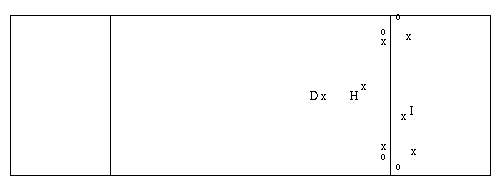
The Iso is positioned about two yards to the open side of the force, rather than directly in front of the Handler; s/he does not cut to this position, but sets up there and stands still. This positioning of the Iso creates an alley for an inside out pass.
As with how a Dump works, the general rule is: a) if the Iso's marker is looking at the Iso, the Handler will initiate action with a throw; or b) if the Iso's marker is looking at the Handler, the Iso will initiate action with a cut.
The Handler now has 3 options to pass to the Iso: 1) left, 2) right and over
the top (this latter is a lower percentage throw). The Handler needs
an inside out throw for (1), but it is one that is fairly easy to
make (see figure).
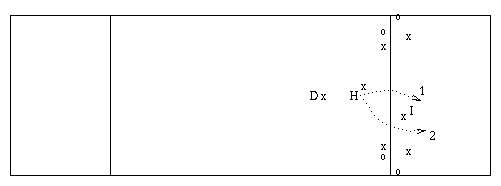
If none of the passes are available, the Handler turns to the Dump and unloads the disc. The Iso clears to the sideline, the Handler becomes the new Iso, the Dump is now the Handler, and one of the other players on the sideline becomes the new Dump. Go again.
This Iso play can easily be run from flow. The Handler simply calls someone to be an Iso, and the other players should take this cue to go to the front corners of the endzone, leaving only the Iso in the scoring area. Typically, a dump will already be in position. If not, someone should quickly fill in directly behind the Handler.
One scenario occurs when this play is used off a time out more than once, and is recognized by the defense. Hence, poaching will likely occur. The easy way to deal with poaching off a set play is to have a Dump in position, and the other 5 players lined up halfway back into the endzone, with 3 in a lateral stack just inside the left sideline, and the other 2 in a lateral stack just inside the right sideline.
When the disc is checked in, each inside player in the two
stacks makes a cut toward
each other, then cuts just out of the endzone along an angle
toward the sideline. A second later, the next two players in each
stack make the same cut, and move out of the endzone. This leaves one
player in the endzone, and that player would typically make a cut
straight across the endzone for a pass; if a clear throw isn�t
open, the receiver then makes a cut toward the thrower for a pass
(see figure).
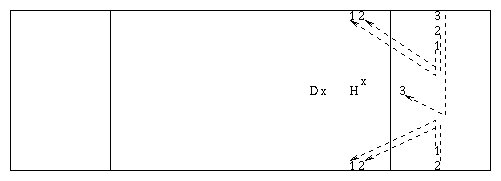
The second scenario occurs when the disc is close to one sideline.
This results in the Iso player not having two good options to cut to.
The solution to this dilemma is to have the Iso set up as a Square
first, with all the other receivers across the field. The handler
then faces the Square, and makes a break pass to the Square, getting
the disc off the sideline (see figure).
(Of course, if the Square's marker lets the Square cut to the
endzone for an easy pass, so be it).
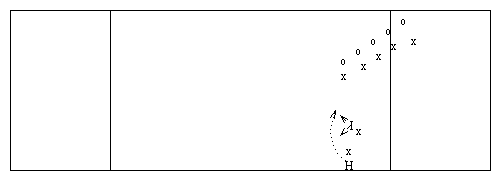
Once the disc is off the
sideline, the Handler can become the Iso, and one of the other players
moves over to become the Dump directly behind the new Handler.
This play starts out similar to the setting up of the 3-4 Offense. Either two Handlers or three Handlers can be designated.
On the Pull, all the remaining players run quickly upfield, heading to the far goal line. This has the effect of opening up the middle of the field, and helps eliminate poaches.
When the potential receivers reach about 2/3 of the way to the goal line,
one pre-designated receiver does a button hook and cuts back toward
the Handlers (while the others keep going). In the meantime, after
one or two passes by the Handlers, the next pass will be made to the
sole receiver making his/her cut back (see figure).
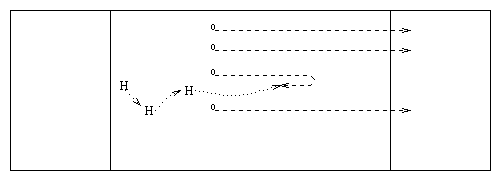
This play works because of the element of surprise, and because the receiver cutting back has the entire width of the field into which to cut. This play typically results in gaining 10-20 yards in the first one or two passes, and then an additional 30 yards or so with the pass to the sole receiver.
Following the pass to the sole receiver, there should be only 3 (or 4) offensive-defensive pairs in or near the endzone. This would be a good time to spread the field (all to one side, or split the field), and run the Endzone Play. The receiver with the disc should take charge and direct the play from here.
Note: this play will not be effective if the disc goes out of bounds
on the pull (in which case the 3-4 Offense is
a good bet), or a zone is used by the defense.
This zone is particularly devastating when the trap is set up as shown in the figure on the right. Thus, one of the goals of this zone is to force the disc to the sideline without giving up to much ground. If there's any kind of cross wind, then the fish should force the disc towards the sideline that is in the downwind direction. This makes getting the disc out of the trap situation even harder.
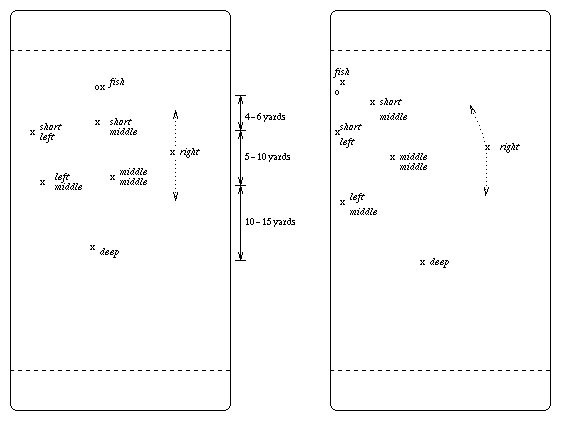
Note: strong-side = side of the field to which we're forcing. In
the figure above, the strong-side is the left side.
weak-side = opposite-side of the field.
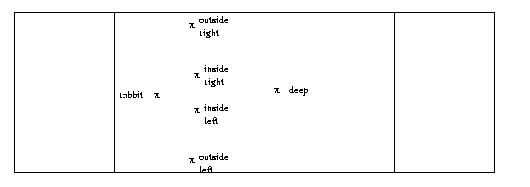
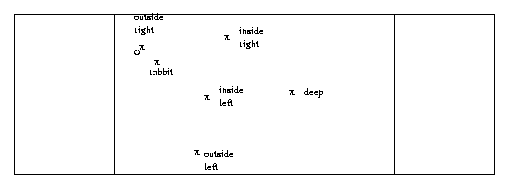
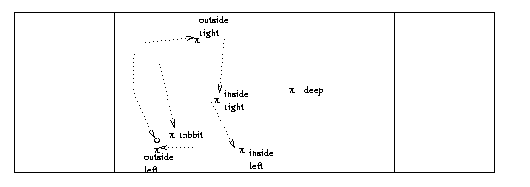
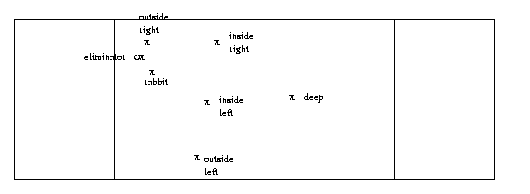
How many times have you found yourself saying, "I don't care if they score, just don't let HER get the disc." This is usually uttered because she's the one that makes the team go. The Eliminator is designed to deny that special opponent the disc by playing man on the offensive person you wish to eliminate and zone with the remaining six defenders on the field. The version of the eliminator described here is much like a 2-3-1 (or 2-2-2 for you Americans) and fish combined.
The set-up is designed to trap the disc on one sideline. In the
pictures shown, the trapping sideline is on the defenders' left.
The offensive player being eliminated and the defender covering
him/her or not shown.
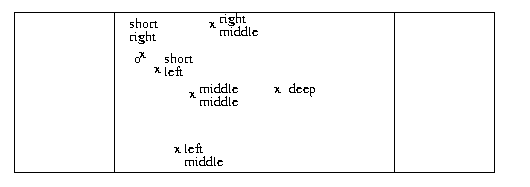
Initially, the short right will mark the disc towards the left
sideline. If the disc is near the right sideline, the force is
almost straight up. As the disc gets closer to the left sideline,
the mark shifts so that he/she is forcing more and more left. The
short left plays like a top of the cup. Communication between the
middle middle and short left is vital. Usually, two offensive players
will be in the middle of the field. The middle middle will cover the
deeper one and postion the short left to take away the shorter receiver.
The left middle has the most ground to cover and has to be on his/her
toes. The right middle will be called back in case the deep needs
help.
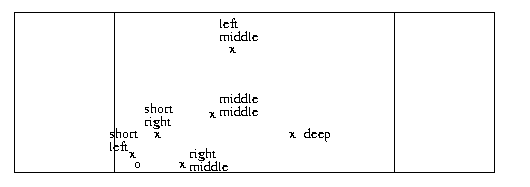
As soon as the offensive team gets to the left sideline, a trap set will be formed as shown above. If it was a long pass that got the team to the sideline, the short left will quickly set up the mark first taking away the lane from which he/she came and then taking away the dump as the short right gets in position. If it was a short pass that put the team on the sideline, then the short right will continue to mark and the positions of the two shorts in the picture need to be reversed. The left middle forms the third person in the trap set, but is positioned about 15-20 feet from the disc. The deep needs to cheat towards the left sideline. The middle middle lets the shorts know where to go as offensive players come through.
However, if the person you're trying to eliminate is in the dump
position, it makes no sense to both cover him/her and take away the
dump with the mark. In this case, you will force the person with
the disc straight up with one of the shorts and take away the swing
pass with the other short. This relaxes the strain that's on the
left middle as seen in the following picutre.
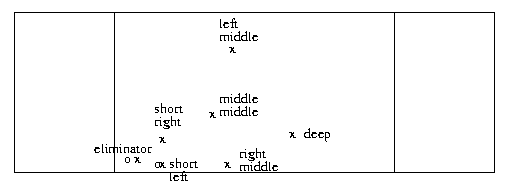
Unfortunately, the person you're trying to eliminate will still
probably get the disc.
If the person you're trying to eliminate catches the disc on the
sideline, then you should set up a trap set just like with the
fish as shown below.
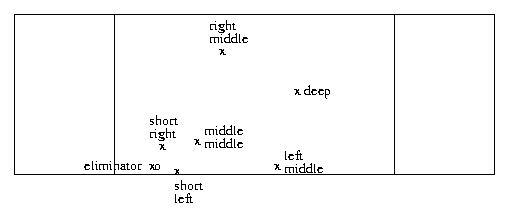
If the person you are trying to eliminate gets the disc away from the
sideline, then the eliminator can mark straight up, with the shorts off to
the sides, allowing the offensive player to dump the disc or move
it laterally as shown in the picture below.
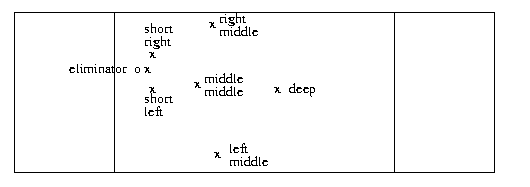
There are other alternatives, of course. One effective solution is for the eliminator only to play person-on when the person you want to eliminate is in a handling position against the zone. As soon as that person goes into a mid or deep spot (deep especially), you might want to have the eliminator stay in and become a third member of a traditional cup or take up a position so that the team can fall into the fish zone.
I have diagrams explaining a further possible elimination, but do
not have the time to describe the situation in full as of yet. For
those curious, see Eliminator II and try to
piece things together for yourself. Rather than trapping, the goal
with this zone is to always force middle.
The goal of this zone is to force the disc back towards the middle of the field.
At the moment, I haven't had time to write a complete description. However, you
can probably piece things together knowing that the elimator is covering his/her
person wherever he/she is.
